How to create individual users, bulk import users, and update permissions levels for users.
Bright enables customers to tailor the access and permissions of all users using a simple table format where are all attributes of a user can be edited and refreshed in real time. Follow the steps and instructions below to make changes for your organization's user access and permissions.
Navigating to the User Access Form
From the Admin Panel, select 'Users' in the left navigation bar.

Filter + Bulk Editing for Existing Users
Once you've navigated to the User Table, you will see a list of current, Active users in alphabetical order. From this main table you can make bulk edits and filter the table to see certain group attributes.
To filter:
- Navigate to the filter symbol in the upper righthand corner

- We automatically filter the table on 'Active' users since these are the people most Admins are interested in and this is why there is a blue circle with '1' highlighted on the filter icon
- When you click this icon, you are able to filter using a variety of different attributes including all Tiers of Teams, Assignment Path, Permission Level, Role and User Status
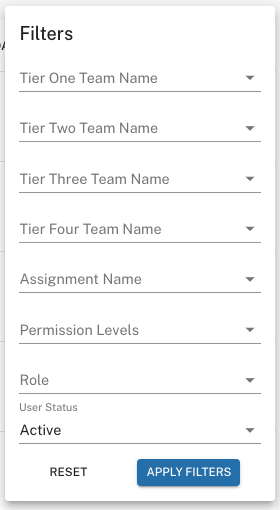
- Once you select the filters that you want to apply, click 'Apply Filters'
To bulk edit:
- Now that you've filtered on a group of individuals with similar attributes, you may want to make a bulk edit to their Team or Assignment path
- Do this by clicking on the checkbox
 at the top of this list - this will select all people in this group
 - Navigate to the bottom of the list and select Edit Team, Edit Assignment or Mark as Inactive

Adding New Users
If you want to add a new user you can add one at a time or use our bulk import tool to add many users at once.
To add one user at a time:
- Select the '+' sign in the upper lefthand corner of the User Table
- Once you've navigated here, you will need to fill out the necessary details. Below is an overview of each user access field
- All fields with an asterisk must be completed
- Once these fields have been completed, click 'Create User'
- Name Fields: Depending on the data provided by your HR/IT teams, there will be a series of name fields, such as Full Name, First Name, Last Name, or Preferred Name. These fields determine how the learner's name will be displayed in reports, as well as in their profile in the upper right hand of the platform. Preferred Name typically drives the 'Welcome' message that the learner sees on the Bright landing page.
- Unique ID: This field contains whatever data point your organization uses as a unique identifier of employees. This may be an email, an employee number, or other similar content. For most customers, this field drives the Platform authentication process. Depending on your organization's authentication approach, without a unique ID, the learner will either be unable to access the platform, or will see no content when they arrive.
- Email: this is the email address that is assigned to this user.
- Temp Password: this field only appears if Bright is managing your active directory. Most clients use their own SSO authentication which means this field will not be applicable and therefore invisible. If the field is present, enter a temp password that you will share with new users. This must contain at least 1 uppercase letter, 1 lowercase letter, 1 number and 1 special character.
- Role: This field typically corresponds to the learner's official job title. The role tag is often helpful for reporting purposes to show progress/performance across associates in a common role.
- Permission Tags: Select Learner, Coach or Admin access. The Coach/Admin permission levels determine whether a user can act as a coach (e.g. rate Moments; host a Certification session) or an admin (e.g. create Moments/Sims; view reporting). If you Permission someone as a Coach, in addition to selecting which team they are on, you have the opportunity to select which Teams they will coach. The Coaching selection box appears when you permission someone as a Coach and you select the team that they coach in the same way that you select a Teams tag below. For more information on how to set these permissions, check out this help article.
- Team Tag: Here you will select which team your user will be assigned to. The team selection modal will pop-up and you'll have to select each team tier your user will be associate with. This is extremely important and drives which reports that they will show up under and which coaches will be assigned to them. It's important to have your Team structure already in place before you add any users. For information on how to set up your Team structure see this help article.
- Assignment Tag: This field corresponds to which Assignment Path and the content that the user will receive when they login to the platform (additional article featured HERE). It's important that you have at least one Assignment Path created before adding any users.
To bulk import users:
- Click on the paperclip icon in the upper righthand corner of the User Table

- A prompt will appear and you can download the latest user upload template by clicking on the blue highlighted text in the prompt.
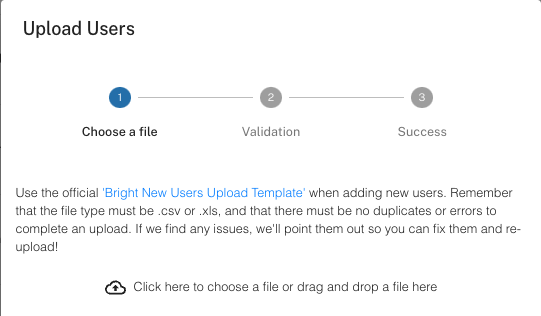
- Ensure your file is in .csv or .xls format
- There may not be any duplicates or errors to complete the upload. Errors occur when there are random spaces or unwanted characters in your spreadsheet so be careful if you are copying/pasting from a different file
- TIP: when copying/pasting from somewhere else, select Paste Values only (PC Hotkey is Control+Shift+V and on a Mac is Control+Command+V then click Values from the list)
- If there are errors or duplicates, we will alert you and you'll have to update your spreadsheet and try to upload again
- When you are ready to upload, you simply drag the file into the upload icon in the above prompt
- If your spreadsheet does not have any errors, it will ask you to confirm your submission
- IMPORTANT: When filling in the spreadsheet, you must input the Team and Assignment path unique ID (not the name of the Team or Assignment). For more information on unique IDs in Bright see this help article.