This article will cover how to add users to Bright without an SSO integration.
SuperAdmin users have access to the Users page in the Admin panel of Bright, where they can set up and edit User profiles. If you do not see Users in the menu on the Admin panel, please contact your Bright account manager.
This article will address how to add users on accounts that are not using SSO.
If you are looking for information on editing User profiles, please see this article.
Adding Users in Bulk:
- Click on the paperclip icon in the upper righthand corner of the User Table

- A prompt will appear and you can download the latest user upload template by clicking on the blue highlighted text in the prompt.
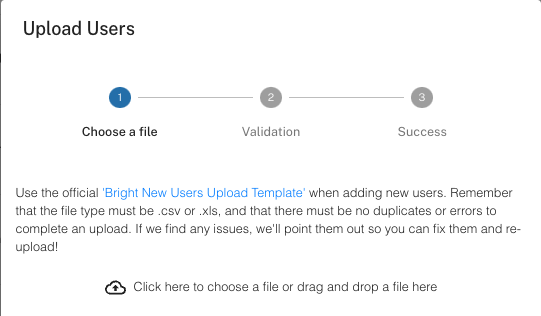
Preparing to Upload:
Once you download the template, there are a few things to know about the format for each cell in the template:

- Find the Unique ID# for the team(s) you will be loading users into (see this Help article for more information)
- Find the Unique ID# for the assignments(s) you will be loading users into in the Assignments table on the admin portal
- Ensure your file is in .csv or .xls format
- Drag your file in or click to Browse and select your file
- If your spreadsheet does not have any errors, it will ask you to confirm your submission
Preventing Upload Errors:
- Errors occur when there are extra spaces or unwanted characters in your spreadsheet, so be careful if you are copying/pasting from a different file
- TIP: when copying/pasting from somewhere else, select Paste Values only (PC Hotkey is Control+Shift+V and on a Mac is Control+Command+V then click Values from the list)
- If there are errors or duplicates, we will alert you and you'll have to update your spreadsheet and try to upload again.
Adding a Single User:
- Select the '+' sign in the upper lefthand corner of the User Table and fill out the necessary details. All fields with an asterisk must be completed
- Name Fields: You must complete First Name, Last Name, and Preferred Name. These fields determine how the learner's name will be displayed in reports, as well as in their profile in the upper right hand of the platform. Preferred Name drives the 'Welcome' message that the learner sees on the Bright landing page, but not the reporting for Coaches and Admins.
- Unique ID: This should match the email address assigned to the user when SSO is NOT being used.
- Email: this is the email address that is assigned to this user.
- Temp Password: Set this and
- Role: This field typically corresponds to the learner's official job title. The role tag is often helpful for reporting purposes to show progress/performance across associates in a common role.
- Permission Tags: Select Learner, Coach or Admin access. For more information on these permissions, check out this help article.
- Team Tag: Here you will select which team your user will be assigned to. The team selection modal will pop up and you'll have to select each team tier your user will be associate with. This is extremely important and drives which reports that they will show up under and which coaches will be assigned to them. It's important to have your Team structure already in place before you add any users. For information on how to set up your Team structure see this help article.
- Assignment Tag: This field corresponds to which Assignment Path and the content that the user will receive when they login to the platform. If you do not select an assignment, the user won't see any content when they log in to Bright.
- Once these fields have been completed, click 'Create User'!